This is a cache of https://www.owenscorning.com/en-us/roofing/install-instructions/skyrunner. It is a snapshot of the page as it appeared on 2026-02-06T02:17:10.287+0000.
VentSure® Sky Runner LTE® Installation Instructions | Owens Corning Roofing
Skip to main content

Precautionary Notes

  • Read all instructions before proceeding.
  • When using pneumatic roofing coil nailers, ensure the depth gauge is set to the minimum depth to penetrate 3/4 inch into the roof deck or completely through the deck by 1/8 inch. The pressure should be set between 80 and 95 PSI.
  • Nails must be corrosion-resistant, 11 or 12 gauge, with heads at least 3/8 inch in diameter and comply with ASTM F1667. Use of ring shank nails may be required by some building codes.1 All fasteners must be installed flush with the ridge vent surface and penetrate 3/4 inch into the wood deck or 1/8 inch through APA (American Plywood Association) rated roof sheathing.
  • Sky Runner LTE® Vent can be installed on roof pitches ranging from 2:12 to 16:12.
  • Follow the Occupational Safety and Health Administration (OSHA) safety standard for roofing.
1Installation under the HVHZ requirements of the Florida Building Code


Installation Instructions

Step 1: Determine Ventilation Requirements

Determine the total required length of the ventilation slot according to the 1/150 rule (1 square foot of ventilation for each 150 square feet of attic floor). For a balanced system, no more than 50% of the required ventilation should be installed at the ridge or hips.

Step 2: Cutting the Vent Slot Opening

  1. Determine the type of roof framing that is used under the roof sheathing.
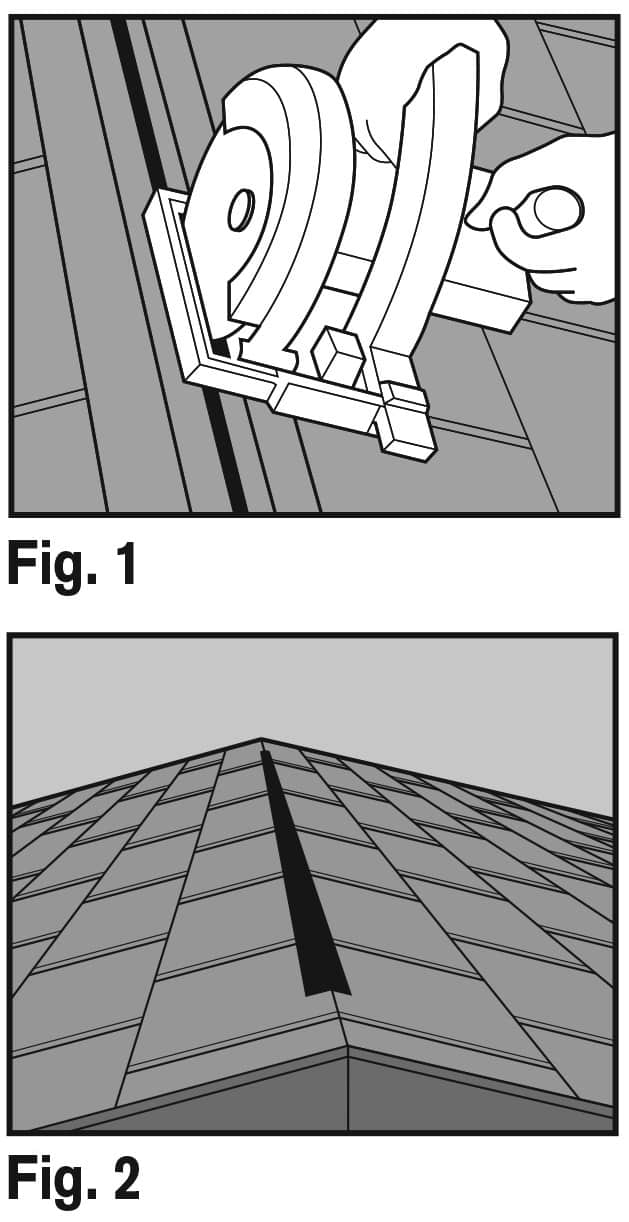
  2. For roofs with a ridge board, cut a 5/8 inch slot in the roof sheathing beyond each side of the ridge board. For an engineered truss roof, cut a 5/8 inch slot on each side of the ridge (total slot width of 1 1/4 inches). See Fig. 1.

    Important: Start and end your cut 6 inches in from the rake edges (snapping chalk lines will aid in keeping a uniform ridge opening). Set your saw depth to cut the decking only. Do not cut into the roof framing. See Fig. 1.

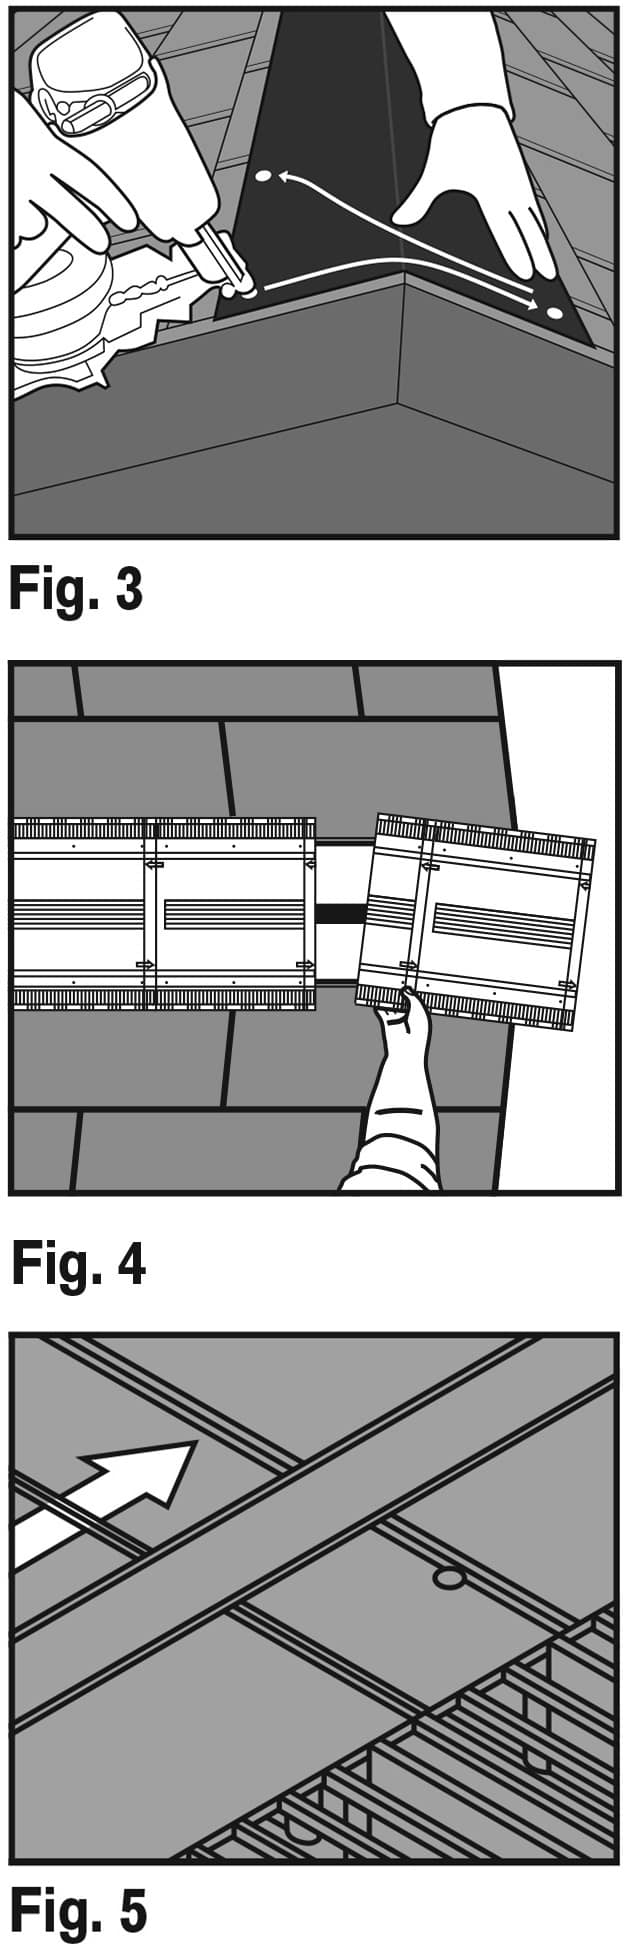
    Note: The ventilation slot may be cut prior to or after shingle installation. If cutting the slot on a roof with shingles installed, use of a circular saw with a carbide tip blade is recommended (Protective eye goggles should be worn during this process).
  3. Expose the vent slot opening by removing the decking that was just cut between the rake edges. See Fig. 2.
Fig 1+2

Step 3: Install shingles up to the ridge slot opening according to shingle manufacturer's instructions.

Step 4: Installing the Ridge Vent

Note: For the best appearance, run the ridge vent from rake edge to rake edge.

  1. Snap a chalk line 7 inches down from the ridge peak on both sides of the ridge from rake edge to rake edge. These will be the alignment lines.
  2. Center the ridge vent evenly between the chalk lines and secure the starting end with one nail on each side of the vent.
  3. Roll out the vent along the ridge, using the chalk lines for alignment. Remove any slack from the vent and nail the vent every 6 inches nailing from one side of the vent then the other. See Fig. 3.

Note: End plugs are built into the vent every 12 inches. The vent should always begin and end with an end plug. See Fig. 4.

Cutting Details: The top of the vent provides directional arrows and cut lines to help with beginning and ending installation. When beginning or ending an install, cut the vent on the cut line indicated by the arrow in the direction the vent is being installed. This will ensure the vent will have an end plug at both ends of the rake edge. See Fig. 5.

Fig. 3-5

Step 5: Ridge Cap Shingle Application

  1. Ridge cap shingles should be installed from rake edge to rake edge, starting at the opposite end from which the prevailing winds blow.
  2. Apply ridge cap shingles over the ridge vent by centering the shingle over the vent.

Note: When nailing the shingles, ensure corrosion-resistant, 11 or 12 gauge nails are used with heads at least 3/8 inch in diameter. All fasteners must be flush with the shingle surface and penetrate 3/4 inch into the wood deck or 1/8 inch through APA rated roof sheathing. Cap shingles should be installed per the shingle manufacturer's installation instructions. See Fig. 6.

Fig. 6

Contact Us

Even though we’re a global company, we’re always ready to answer your questions. Call to speak with an Owens Corning representative.